

What if the final walkthrough is less about finding every flaw and more about confirming that the seller has met the agreement? A final walk through checklist before closing helps you focus on the home’s visible condition, agreed repairs, and items meant to stay. It’s a verification step, not a second home inspection, and it often takes place 24 to 72 hours before closing.
It’s natural to wonder what to inspect and whether reporting a problem could affect closing. A calm, methodical walkthrough gives you a practical way to check each room and the home’s accessible systems. Use your purchase agreement and written repair commitments to guide what you verify. If something seems wrong or an agreed item is missing, make a note, take a photo if appropriate, and contact your buyer’s agent promptly to discuss next steps before closing. This checklist covers what to check, what to bring, and how to raise concerns as you prepare for the transition.
Key Takeaways
- Use a consistent room-by-room order and compare visible conditions with what you saw during your last visit.
- Bring your purchase agreement and any written repair commitments so you can check the agreed terms rather than rely on memory.
- Confirm that included appliances and other items remain, and look for visible evidence that agreed repairs are complete.
- If you notice a concern, record what you observed and review it with your buyer’s agent before closing.
- In Michigan, your signed documents and closing arrangements help determine appropriate next steps.
Final Walk Through Before Closing: What It Is and Isn't
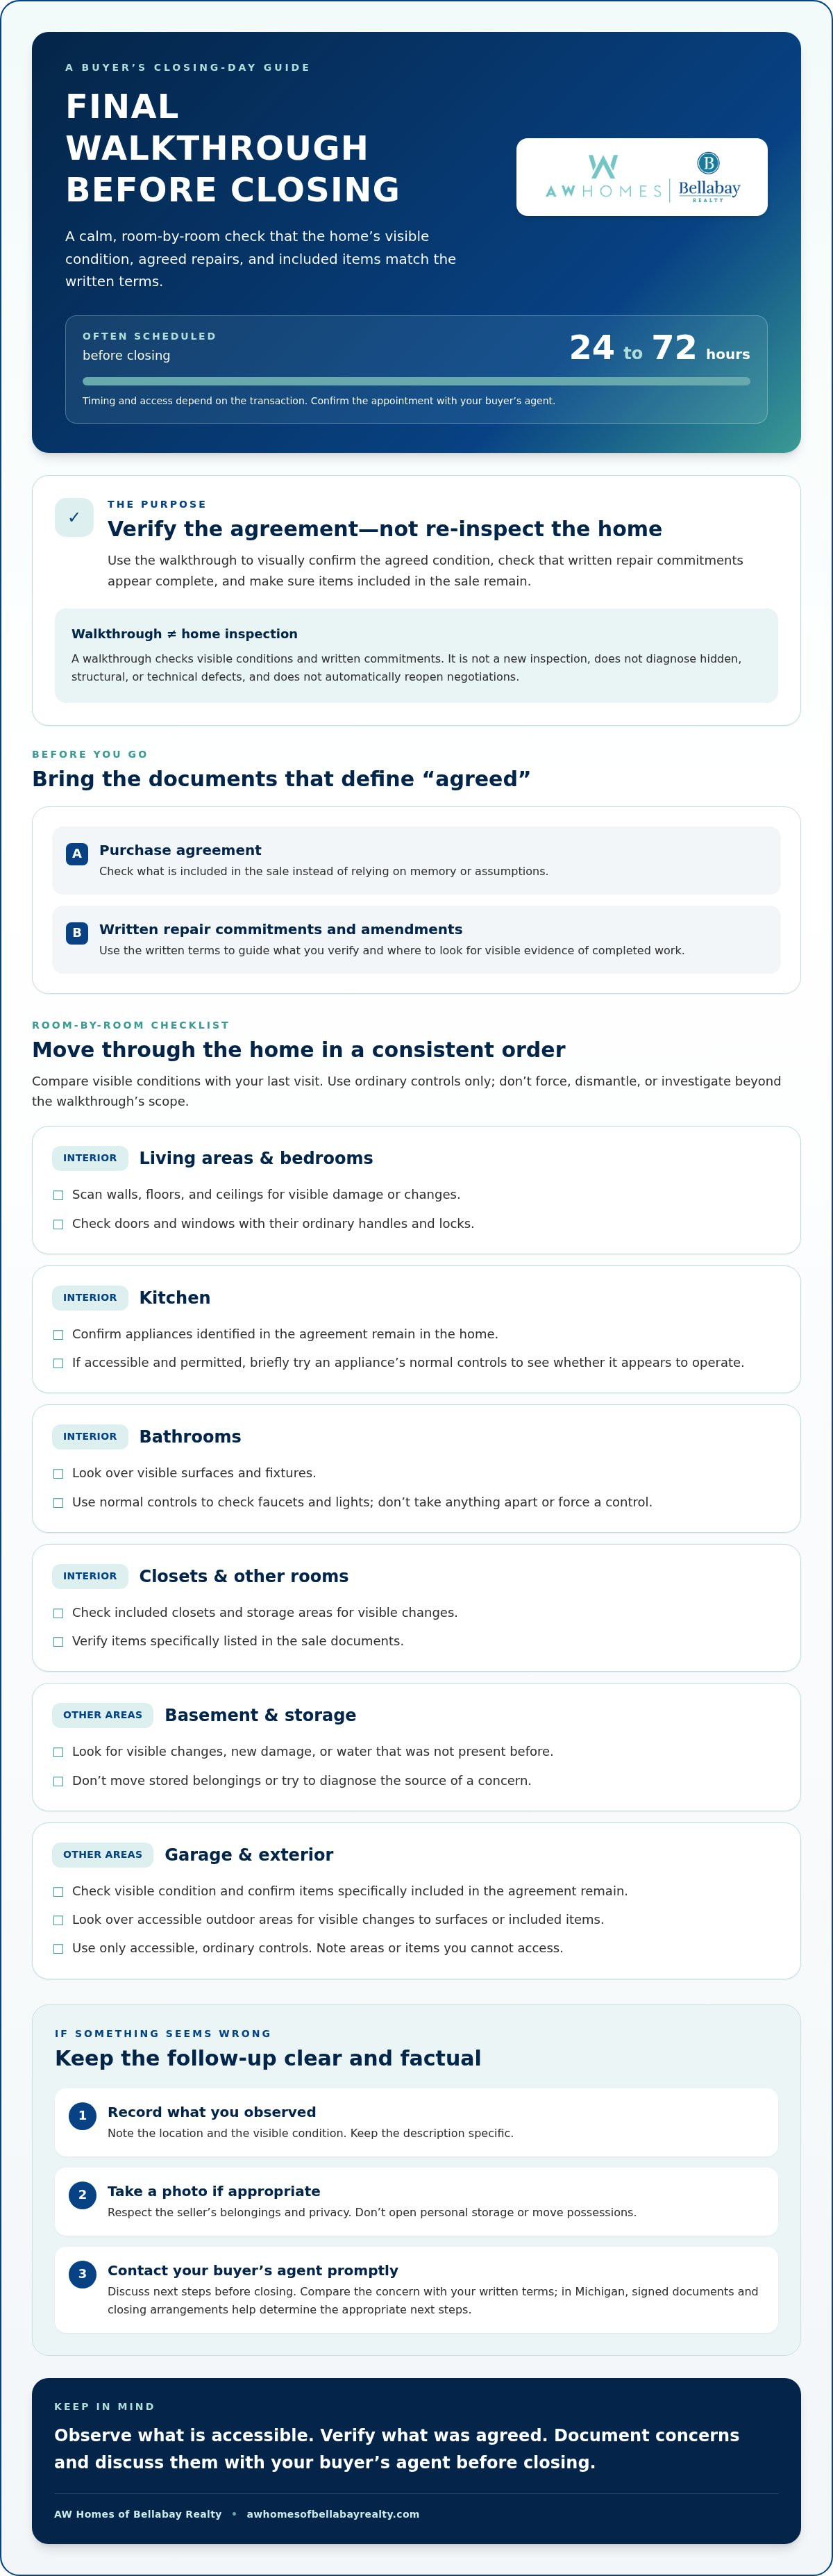
A final walk-through is the buyer’s last visual check of the property before closing. The goal is to confirm that the home appears to be in the agreed condition, written repair commitments appear complete, and items included in the sale are still there. Treat it as a focused check against the purchase agreement and any written amendments, not as a new search for anything you might want changed.
For example, if the agreement says a refrigerator is included, confirm it remains in the home. If a written amendment specifies a repair, look at the relevant area for visible evidence that the work was completed. Check the documents rather than relying on memory or an informal conversation. The walkthrough takes place shortly before ownership transfers as part of the broader closing process.
A final walk through checklist before closing keeps the visit organized, but it doesn’t turn the walkthrough into a new inspection or automatically reopen negotiations. If you notice a concern, record it and raise it with your buyer’s agent. The written terms and transaction arrangements help determine what to do next.
When to Schedule the Final Walkthrough
Coordinate the appointment with your buyer’s agent and the closing schedule. Walkthroughs are often arranged within 24 to 72 hours before closing, but timing and access depend on the transaction. Seeing the home as close to closing as practical lets you check its current condition, including whether agreed items remain and whether anything appears to have changed since your last visit. Confirm the specific timing with your agent.
How the Walkthrough Differs From a Home Inspection
A home inspection is a separate evaluation. The walkthrough is a visual verification of the agreed condition and written commitments. You aren’t expected to diagnose hidden, structural, or technical defects during this visit, and it doesn’t replace inspections completed earlier in the transaction.
A walkthrough verifies what was agreed; an inspection evaluates the home’s condition. If you spot something concerning, note what you observed and ask your buyer’s agent how to proceed. Keep your observations specific and compare them with the documents that guide the sale.
Final Walk Through Checklist Before Closing: Check Every Room
Use this final walk through checklist before closing on your phone or as a printed list. Move through the home in the same sequence each time, comparing what you see with its condition during your last visit. Focus on visible changes and items named in your agreement. The walkthrough isn’t the time to investigate beyond its scope.
Interior Rooms, Fixtures, and Included Items
- Living areas and bedrooms: Scan walls, floors, and ceilings for visible damage or changes. Check doors and windows using their ordinary handles and locks.
- Kitchen: Confirm that appliances identified as included in the agreement remain. If the appliance is accessible and you’re permitted to use it, try its normal controls briefly to see whether it appears to operate.
- Bathrooms: Look over visible surfaces and fixtures. Use normal controls to check faucets and lights, without taking anything apart or forcing a control.
- Other rooms: Check closets and storage areas included in the walkthrough for visible changes or items specifically listed in the sale documents.
Use the purchase agreement and written amendments as your reference. A light fixture, appliance, or other item may not be included just because it was present during an earlier visit. Verify what the documents say, and make a note if an item seems missing or different.
Basement, Garage, and Exterior Areas
- Basement and storage: Look for visible changes, new damage, or water that wasn’t present before. Don’t move stored belongings or try to diagnose the source of a concern.
- Garage: Check the visible condition and confirm that items specifically included in the agreement remain. Use only accessible, ordinary controls.
- Outside: Look over accessible outdoor areas and note visible changes to surfaces or included items.
In Greater Grand Rapids, weather may affect what you can see during the visit. Note observable conditions, such as standing water or a changed surface, but don’t assume what caused them. If an area or agreed item isn’t accessible, record that too and ask your buyer’s agent how to follow up.
Keep your record simple: note the location and what you observed, then take a photo if appropriate. Respect the seller’s belongings and privacy. Don’t open personal storage, move possessions, or test systems in a way that could cause damage. A local buyer’s agent can help organize the walkthrough and communicate concerns. Greater Grand Rapids buyer guidance can help you prepare for this step.
Verify Repairs, Utilities, and the Home’s Working Condition
Use this part of your final walk through checklist before closing to compare written commitments with what you can see at the property. Bring the purchase agreement, any amendments, and repair documentation. The goal is to confirm that specified work appears complete, not to assess workmanship beyond the written terms or make a technical judgment. If a document is missing or something doesn’t match, make a note and ask your buyer’s agent to review it with you.
Confirm Agreed Repairs and Documents
Read each repair commitment as written, then check the location and evidence it describes. For example, if an amendment identifies a repaired window, look at that window and note what you observe. Documentation may help confirm completed work if it was provided or requested. Don’t assume a particular document is required unless your transaction’s written terms say so.
- Written commitment: Repair a named faucet. Check: Look at that faucet and, if appropriate, test it using its normal handle.
- Written commitment: Replace a specified appliance. Check: Confirm that the identified appliance is present and appears to operate using ordinary controls.
- Written commitment: Address a specific visible area. Check: Compare that location with the description and any completion evidence in your documents.
Check Systems Without Attempting a Technical Inspection
Using ordinary switches and controls, you can check whether lights turn on, faucets run, toilets flush, and heating or cooling controls respond. Test included appliances only when accessible and appropriate. Describe what happened plainly, such as “the hall light didn’t turn on,” rather than diagnosing wiring or a system failure.
Visible checks can confirm basic operation, but they don’t replace professional inspections. Don’t remove panels, take equipment apart, or operate controls you haven’t been authorized to use. If something seems unusual, document the observation and contact your buyer’s agent for guidance.
Utilities, access, and seller occupancy arrangements depend on the transaction. Confirm in advance whether utilities are available for checks, which areas you can enter, and whether the seller will remain in the property after closing. Don’t assume that systems can be tested or that access will be the same in every sale. Your buyer’s agent or closing professional can help clarify the arrangements and next steps based on your signed documents.
What to Do If the Final Walk Through Reveals a Problem
Finding a concern during the final walkthrough can feel unsettling, especially with closing approaching. Take a measured approach: record what you observed, contact your buyer’s agent promptly, and review the written terms together. A missing included appliance, an incomplete repair, or new visible damage may call for follow-up, but the right response depends on the documents and the people involved in the transaction.
Document and Communicate the Concern
Make a brief, factual note that identifies the location and condition. For example, write “water visible beneath the kitchen sink” rather than guessing at the cause. Take a clear photo if appropriate and keep it with your walkthrough notes. Share the information promptly with your buyer’s agent and, if advised, the relevant closing contact. Early communication gives the parties an opportunity to review the issue before closing.
Keep a record of related messages and any proposed resolution. If someone discusses a possible fix or other arrangement verbally, ask your agent how to have any agreed terms documented appropriately. Don’t treat an informal assurance as a substitute for written clarification.
Understand Possible Next Steps Without Assuming an Outcome
Ask your agent to compare the concern with the purchase agreement, amendments, and repair documents. A visible difference may or may not relate to a written commitment, so focus on what the documents actually say. Your agent can help coordinate communication and explain transaction steps. Questions about contract interpretation or legal rights may require advice from a qualified legal professional.
Depending on the issue, the agreement, and the parties’ decisions, they may discuss a repair, another resolution, or whether closing arrangements need to change. None of these outcomes is automatic. Don’t decide on your own to delay closing or assume that a credit, repair, or other remedy is guaranteed. Confirm transaction-specific timing and next steps with your agent or closing professional before acting.
Use your final walk through checklist before closing to keep observations organized, then pass concerns along clearly. For buyers in Greater Grand Rapids and nearby communities, a buyer’s agent can help coordinate the conversation and keep it grounded in the signed documents. Connect with AW Homes for buyer guidance as you prepare for the final steps toward closing.
Finish the Walkthrough and Arrive at Closing Prepared
A completed walkthrough is one step toward closing, not a reason to stop checking the details. Before you leave, review your notes and checklist, make sure any concerns have been shared with the appropriate professional, and confirm what happens next. Keep the purchase agreement, amendments, and closing instructions easy to access in case questions come up.
A Simple Walkthrough-to-Closing Handoff
Use this final sequence to close the loop:
- Review: Check that you’ve completed your walkthrough list and recorded any items that need follow-up.
- Report: Make sure your buyer’s agent has received your observations and any relevant photos or notes.
- Confirm: Ask who will follow up, what the next step is, and whether you need to do anything before closing.
- Proceed: Follow guidance from your agent or closing professional based on your signed documents and transaction arrangements.
Don’t assume the walkthrough itself changes the purchase agreement or closing requirements. If the parties discuss a resolution to a concern, ask how it should be confirmed and documented. Michigan transaction details depend on the documents you signed and your closing arrangements, so confirm specifics with the professionals involved. For a broader overview of the timeline, consult the Michigan Home Closing Process guide.
Local Guidance for Greater Grand Rapids Buyers
Coordinating the walkthrough with the closing timeline can help keep the handoff clear. A buyer’s agent can help arrange access, bring relevant transaction details into the conversation, and communicate an observation to the appropriate person. That guidance can be useful when you’re managing the final steps alongside a move or other life changes.
Whether you’re buying in Grand Rapids, Ada, Caledonia, or East Grand Rapids, keep your final walk through checklist before closing and transaction documents together until next steps are confirmed. A clear record, timely communication, and a confirmed plan can make the transition from walkthrough to closing more organized.
If you’re planning a purchase in Greater Grand Rapids and would like to discuss buyer representation, talk through your home-buying next steps with AW Homes.
Move Toward Closing With a Clear Plan
A thoughtful final walk through checklist before closing helps you finish this step with observations organized and next actions clear. Focus on the home’s visible condition and written commitments, and bring questions to your buyer’s agent promptly. If something needs attention, confirm how it relates to your documents and what steps the transaction’s professionals recommend.
Closing is a meaningful transition, and steady guidance can make the process feel more manageable. AW Homes of Bellabay Realty supports buyers with representation and transaction guidance, local knowledge across Greater Grand Rapids communities, and a concierge-style approach to important home transitions.
If you’re preparing for a purchase or considering buyer representation, talk through your home-buying next steps with AW Homes. With a clear plan and appropriate support, you can approach closing with your questions and next steps in order.
Frequently Asked Questions
What should I check during the final walk-through before closing?
Check the home’s visible condition against your last visit and the written terms of your purchase. Look for new damage, confirm items listed as included remain, and check whether agreed repairs appear complete. You can also use ordinary controls to test accessible lights, faucets, toilets, and included appliances. A final walk through checklist before closing helps you move room by room and record observations without attempting a technical inspection.
How soon before closing should I do the final walkthrough?
Buyers commonly schedule the walkthrough within 24 to 72 hours before closing, but your transaction’s arrangements determine the actual timing and access. Coordinate with your buyer’s agent and closing schedule so the visit takes place as close to closing as practical. That timing lets you check the home’s current condition. Confirm the appointment details with your agent rather than assuming the same schedule applies to every purchase.
Is the final walkthrough the same as a home inspection?
No. A home inspection is a separate evaluation of the property, while the final walkthrough is a visual check before closing. Its focus is whether the home appears to be in the agreed condition, written repairs appear complete, and included items remain. You aren’t expected to diagnose hidden or technical defects during the walkthrough. If you notice a concern, describe what you see and ask your buyer’s agent how to follow up.
What happens if repairs are not finished at the final walkthrough?
Document what appears incomplete, note the location, and contact your buyer’s agent promptly. Review the purchase agreement, amendments, and repair documentation together to see what was written and agreed. The parties may discuss possible next steps, but a repair, credit, or change to closing arrangements isn’t guaranteed. Ask your agent or closing professional what applies to your transaction, and request that any agreed resolution be confirmed in writing where appropriate.
Can a buyer back out after the final walkthrough?
A concern discovered at the walkthrough doesn’t automatically mean a buyer can cancel the purchase. Whether a buyer has options depends on the signed contract, the circumstances, and applicable legal rights. Don’t assume you can walk away or make a decision based only on a verbal conversation. Contact your buyer’s agent promptly to review the written terms; consult a qualified legal professional for advice about contract interpretation or legal rights.
Should utilities be on during the final walkthrough?
Utility availability depends on the transaction’s arrangements, so confirm with your buyer’s agent before the visit. If utilities are on and you have permission, you may use ordinary controls to check accessible lights, faucets, toilets, heating or cooling controls, and included appliances. If a system can’t be tested, record that fact rather than assuming it works or diagnosing a problem. Your agent can help clarify access and how to report observations.
What should I bring to a final walkthrough?
Bring your purchase agreement, written amendments, repair documentation, and any inspection report you want to reference. Keep a phone handy for brief notes and photos of relevant observations, and use a room-by-room checklist to stay organized. Buyers in Grand Rapids, Ada, Caledonia, and East Grand Rapids can ask their agent which documents or access details are useful for their transaction. Confirm any closing instructions with the professionals handling the sale.


