

The right documents and funds help keep closing day focused on signing, not searching through bags. Knowing what to bring to your real estate closing starts with a government-issued photo ID, proof of homeowners insurance if you’re buying with a mortgage, and the funds required for your transaction. Buyers should also have their purchase contract and any documents their lender requested. Sellers typically need identification and property-related items.
It’s natural to want a clear checklist as a home purchase or sale reaches its final step. This guide explains what buyers and sellers may need, how to prepare closing funds, and which paperwork to review carefully before signing.
We’ll cover identification and insurance proof, closing costs and prepaid expenses, the Closing Disclosure, seller paperwork, and extra documents that may apply to financed purchases or down payment assistance. A little preparation can make closing feel more orderly and help you focus on the next chapter.
Key Takeaways
- Pack a government-issued photo ID, and bring proof of homeowners insurance if you’re buying with a mortgage.
- Use your closing figures to prepare the down payment, closing costs, and prepaid expenses, then follow the accepted payment method.
- Compare your Closing Disclosure with your Loan Estimate so you can spot changes and understand the final figures before signing.
- As a seller, gather property-related documents and be ready to sign the deed and other title paperwork.
- For a financed purchase or down payment assistance, organize any income and asset documents your lender requested before closing day.
Photo identification and proof of homeowners insurance
Prepare identification and insurance documents before closing day so the title company can complete its part of the process. Buyers and sellers should keep required items together and ready to present.
-
Bring photo identification
Bring a government-issued photo ID, such as a driver’s license or passport, to the closing appointment. Every seller named in the contract should have identification available, and buyers should bring theirs too. Before leaving, confirm that each document belongs to the person attending and is easy to access. Keep IDs with your closing paperwork, not in checked luggage or a packed moving box.
-
Obtain homeowners insurance
Arrange homeowners insurance for the home you’re buying and coordinate the policy details with your mortgage lender. Your lender may have specific homeowners insurance requirements, so confirm the details before closing. Review the property address, named insureds, coverage amount, and policy effective date. For example, if the purchase is financed, confirm the coverage meets the lender’s requirement before the closing date.
-
Provide proof of homeowners insurance
Bring proof of insurance, such as the policy declarations page or an insurance binder, to show the coverage arranged for the property. Keep a digital and printed copy with your closing documents. Check that the address and coverage details match the home you’re buying. Having the document ready can help resolve a missing-paperwork issue if the lender or title company requests it.
- Keep insurance paperwork separate from general moving documents. A folder labeled “closing” can hold your ID, proof of coverage, and lender correspondence. If a document arrives electronically, save it on your phone and bring a printed copy as backup. This makes it easier to find the right insurance record when the title company requests it.
- Plan the handoff of insurance and utilities after closing. Sellers should verify that sale proceeds were deposited correctly, then cancel their homeowners insurance policy and keep their closing paperwork. Buyers should arrange utility account changes for the new home and save confirmation details with their move-in documents. Record utility providers and scheduled transfer dates in one place so responsibilities don’t get lost during the move.
Closing costs, down payment, and prepaid expenses
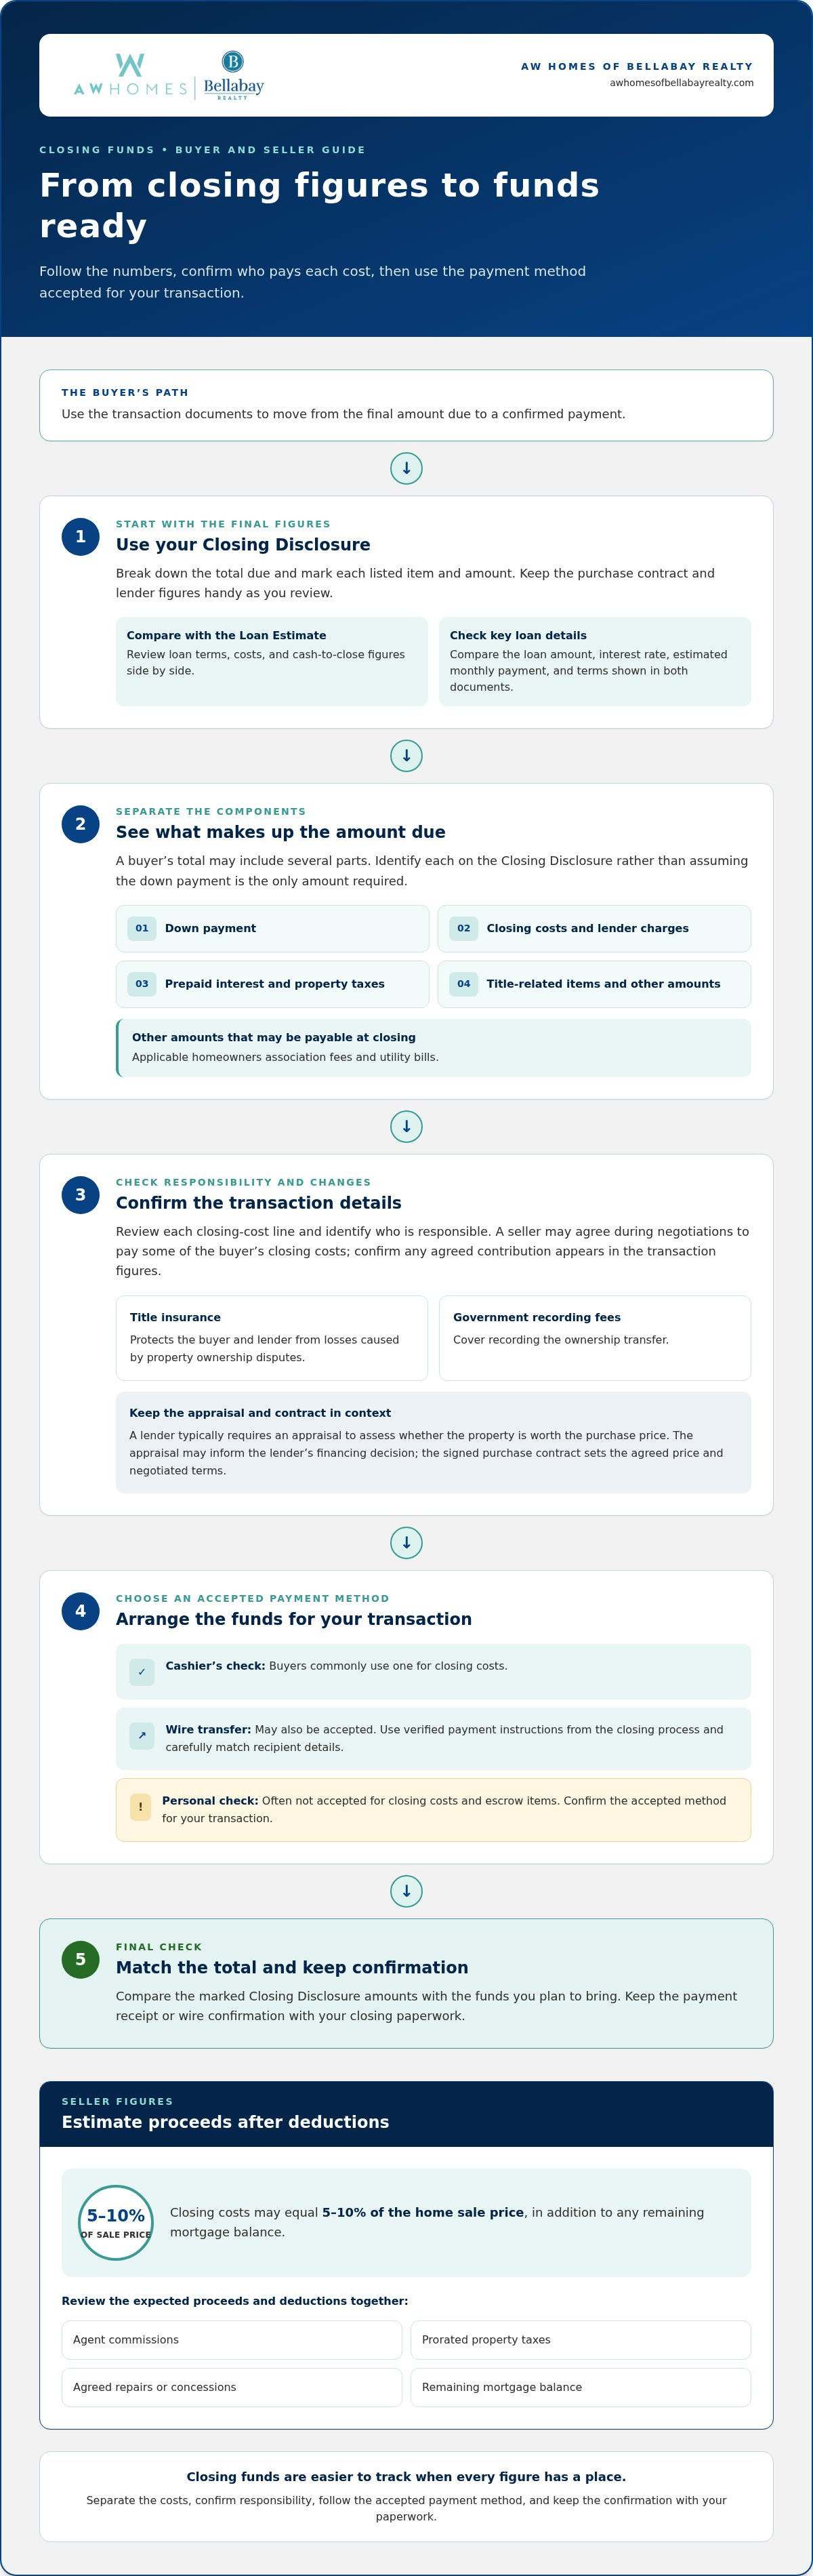
Prepare the funds and payment method specified in your closing documents. A buyer’s total may include the down payment, closing costs, prepaid interest, and property taxes due.
- Use your Closing Disclosure to break down the total due. Separate the down payment from lender charges, title-related items, prepaid expenses, and other amounts. Property taxes, applicable homeowners association fees, and utility bills may also be payable at closing. Mark each listed item and amount on a copy, then compare the total with the funds you plan to bring.
- Arrange payment using the method accepted for your transaction. Buyers commonly use a cashier’s check for closing costs, and a wire transfer may also be accepted. Personal checks are often not accepted for closing costs and escrow items. Before sending a wire, use verified payment instructions from the closing process and carefully match the recipient details. Keep the receipt or confirmation with your closing paperwork.
- Understand how the mortgage and appraisal affect the final amount. A lender typically requires an appraisal to assess whether the property is worth the purchase price. The appraisal may inform the lender’s financing decision, while your signed purchase contract sets the agreed price and negotiated terms. Keep the contract and lender figures handy as you review the funds due. Don’t assume the down payment is the only amount required.
- Review each closing-cost line and identify who is responsible for it. Title insurance protects the buyer and lender from losses caused by property ownership disputes, while government recording fees cover recording the ownership transfer. A seller may agree during negotiations to pay some of the buyer’s closing costs. Confirm any agreed contribution appears in the transaction figures before signing.
- As a seller, account for your own closing expenses and remaining mortgage balance. Sellers are usually responsible for agent commissions, prorated property taxes, and agreed repairs or concessions. Closing costs may equal 5-10% of the home sale price, in addition to any remaining mortgage balance. Review the expected proceeds and deductions together. If you’re evaluating a property investment, investment purchase planning can help you consider the transaction’s financial details.
Reviewing the Closing Disclosure
Review the Closing Disclosure before signing and compare it with your Loan Estimate. It brings the final loan terms and transaction figures together in one place.
- Set aside time as soon as the Closing Disclosure arrives. According to the Consumer Financial Protection Bureau, U.S. homebuyers should expect to receive it three days before their scheduled closing. Use that window to read the figures carefully, note questions, and identify any unexpected changes. Don’t leave the review until you’re seated at the closing table, when there’s less time to understand each line.
- Compare your Closing Disclosure with your Loan Estimate, section by section. Check the loan amount, interest rate, estimated monthly payment, and any loan terms shown in both documents. Then compare costs and cash-to-close figures. If a lender charge differs, note the line item and the difference. This gives you a specific question to resolve rather than a general concern about the paperwork.
- Trace the amount due at closing to its components. Review the down payment, closing costs, prepaid interest, property taxes, and credits. If the signed purchase contract includes a seller contribution, for example, look for that credit in the final figures. Confirm that the funds you’ve prepared match the disclosure’s cash-to-close figure. If they don’t, identify which entry explains the difference before signing.
- Review transaction details alongside relevant paperwork, including your purchase contract and any inspection agreement. A home inspection isn’t required, but it’s strongly recommended to assess the property’s condition. If an inspection led to a negotiated repair or credit, compare the agreement with the closing figures. Look for a missing credit or unexpected charge, and note the document or line that needs clarification.
- Work through every page, even if the packet feels long. Homebuyers may receive upwards of 100 pages of closing documents, and the Closing Disclosure is only one part of that paperwork. Check that names, the property address, and the loan details match your transaction. Mark unclear terms and keep your notes beside the disclosure. Ask focused questions about specific entries before signing, so you understand the financial obligations and homeowner rights reflected in the documents.
Closing paperwork sellers may need to sign
- Review the deed and title documents before the appointment. The deed transfers legal ownership to the buyer, and the seller must sign it. The buyer may also need to sign. Title documents show that the seller has clear title and can legally sell the property. Compare the names and property address with the signed purchase contract, and note any mismatch to address before signing the final paperwork.
- Read the seller’s Closing Disclosure when it arrives. Sellers receive this document several days before closing. It outlines final figures such as net proceeds, closing costs, outstanding balances, and fees. Compare those figures with your transaction records and agreed sale terms. If a deduction or balance looks unfamiliar, mark the line and gather the related paperwork. Specific questions are easier to resolve than general concerns about the final amount.
- Gather supporting documents related to the property. Bring lien waivers from contractors when applicable, along with property records requested for the transaction. Keep them together in a labeled folder, separate from documents you need to sign. For example, place contractor paperwork behind a note identifying the work it concerns. This makes it easier to find the relevant record if the title company needs to review it during the appointment.
- Arrange signing details if you can’t attend the closing appointment. Sellers may be allowed to pre-sign closing documents instead of signing them at the appointment. Organize the paperwork in advance and follow the instructions provided for your transaction. Read each page carefully and keep a copy of completed documents. If there are multiple sellers, make sure everyone knows which documents require their signature and where those pages belong.
- Prepare practical handoff items before leaving the property. Bring house keys and access codes for the buyer, plus a personal checkbook for minor incidentals. Seller proceeds are typically paid by wire transfer or check. Keep a record of the expected proceeds and verify the deposit after closing. Store the signed deed, Closing Disclosure, and other completed paperwork together so you can refer back to the terms of the sale.
At a West Michigan real estate closing with AW Homes of Bellabay Realty, the seller signs documents that can include the deed and affidavit of title. The documents are signed and notarized before the buyer’s funds are released.
What items should buyers bring if they are using a mortgage or down payment assistance program?
- Gather the income documents your lender requested. These may include pay stubs, tax returns, or other records used to verify income. Put the requested items together before closing and make sure each page is readable. If the lender asked for several types of proof, label them clearly. Keep pay stubs separate from tax returns, for example, so you can find the right document quickly.
- Prepare account records that show your available assets. A lender may request bank statements or investment account documents as proof of assets for closing. Organize the specific statements requested and keep them accessible with your closing paperwork. If your down payment or closing funds come from different accounts, make a simple list showing which document corresponds to each account. This keeps asset records distinct from income verification.
- Keep down payment assistance paperwork with the other documents your lender requested. The assistance program may involve paperwork alongside the mortgage file. Arrange documents by purpose, such as program records, income verification, and asset proof. Use the forms and records requested for your transaction. Don’t substitute unrelated financial papers for a requested document, since the lender needs relevant information to review your file.
- Collect required documents ahead of the closing appointment and provide them promptly. A lender may need time to review income and asset records, so late paperwork can affect the closing timeline. Keep a copy of each item you submit and note when you provided it. If the lender requests a particular statement or tax return, send that document rather than a folder of unrelated records.
- Read and sign the mortgage documents that explain your loan terms. Review the loan amount, payment obligations, and other terms presented in the paperwork before signing. Keep the signed documents with your final closing records. If you’re planning a purchase that includes assistance or investment considerations, explore buyer agency guidance to organize your home-buying decisions and transaction steps.
Keep requested income records ready alongside signed mortgage paperwork, and provide the lender’s documents before closing so the review can proceed without avoidable delay. For buyers navigating non-traditional or complex financing scenarios, mortgage brokerages like LoansByJB (The Nuhome Team) can help coordinate paperwork early to ensure a smooth closing.
AW Homes of Bellabay Realty: Residential Listing Services
AW Homes of Bellabay Realty helps buyers and sellers prepare for the decisions involved in a home transaction. Sellers can use Residential Listing Services for guidance through the listing process and steps leading to closing. Buyers can turn to Buyer Agency Services for support as they evaluate homes, offers, and purchase details.
Relocation Assistance supports buyers planning a move to West Michigan, while Real Estate Investment Consulting helps people assess residential investment opportunities. These services can be useful when you’re planning a move, preparing to sell, or weighing a home purchase and want knowledgeable guidance through the transaction.
For guidance tailored to your next real estate move, contact AW Homes of Bellabay Realty.
Step into your next move with clarity
Closing marks a handoff and opens the door to decisions about where life goes next. Use your preparation to approach that transition with intention, whether you’re choosing a new home, planning a sale, or settling into a different community. Knowing what to bring to your real estate closing is one part of a larger move: making choices that fit your priorities and plans. For buyers who are also considering expanding their portfolio into international markets, Chainex Real Estate offers helpful insights on navigating overseas property purchases.
AW Homes of Bellabay Realty supports that next stage through Residential Listing Services, Buyer Agency Services, and Relocation Assistance. If you’re preparing to sell, searching for a home, or coordinating a move to West Michigan, its real estate guidance can help you move forward with a clearer plan.
Contact AW Homes of Bellabay Realty to discuss your next real estate step. Your next chapter can begin with a thoughtful plan and steady guidance.
Frequently Asked Questions
What do I bring to a house closing?
To prepare for what to bring to your real estate closing, pack your photo ID, transaction paperwork, and arranged payment method. Prepare a folder for each person attending, with documents easy to reach. Buyers can keep their signed purchase contract and lender correspondence together; sellers can put keys and access details in a separate envelope. This helps you respond quickly when documents or property items are requested.
What happens during closing?
During closing, the buyer and seller review and sign documents that complete the property transaction. Buyers sign mortgage paperwork outlining loan terms, while sellers sign the deed transferring ownership. Title documents establish the seller’s ability to convey clear title. The closing team handles final funds and transaction paperwork. Before signing, pause at any unfamiliar clause and identify the specific document or term you need explained.
What documents should buyers bring to a real estate closing?
Buyers preparing for what to bring to your real estate closing should include the purchase contract and any records their lender requested, such as income or asset documents. Keep final paperwork separate from older estimates or drafts. Label the signed contract and latest loan documents clearly so you don’t confuse them with preliminary copies. Save electronic documents for easy access and keep printed copies of key records.
What forms of ID are required at a home closing?
Bring government-issued photo identification, such as a driver’s license or passport. Buyers should have ID ready for the appointment, and every seller named on the contract should bring one too. Check each person’s name against the transaction paperwork. If multiple buyers or sellers will attend, keep each person’s identification separate so it’s ready when their documents are presented.
How should buyers bring the closing funds, and are wire transfers or cashier’s checks accepted?
Buyers commonly use a cashier’s check for closing funds, and a wire transfer may also be accepted. Personal checks are often not accepted for closing costs and escrow items. Follow the payment instructions for your transaction, and carefully compare recipient and account details before sending a wire. Save the transfer confirmation or cashier’s check receipt with your closing papers as proof of payment.
How much money should buyers bring to closing, and how is the cash-to-close amount calculated?
Bring the cash-to-close amount shown in your final transaction figures. It generally includes the down payment, closing costs, prepaid interest, and property taxes due, minus applicable credits. The purchase contract, loan terms, taxes, and negotiated contributions affect the calculation. Use the final figures rather than estimating from an earlier loan document. If your planned payment differs from the listed amount, identify the line item causing the difference before signing.
What should sellers bring to a real estate closing?
Sellers should bring government-issued photo identification, property keys, and access codes for the buyer. Keep contractor lien waivers and other transaction paperwork together, especially records related to completed work. A seller may also need property-related documents, such as utility information or warranty paperwork. Put garage remotes and keys in a labeled envelope, separate from signed documents, so the buyer can receive them smoothly.
Should buyers bring proof of homeowners insurance, inspection reports, or repair receipts to closing?
Bring proof of homeowners insurance when buying with a mortgage, since the lender generally requires coverage before lending. Inspection reports and repair receipts can help when they relate to a negotiated repair or credit. Keep those records with the relevant agreement so details are easy to compare. A home inspection isn’t required, but it’s strongly recommended to assess the property’s condition before closing.


